Neck Pain Relief

Just follow along with the videos below and you'll acquire some very powerful tools for fixing your own neck.
Go directly to any Neck Pain Relief video on this page with these links:
Intro,
Video 1,
Video 2,
Video 3 .
Pain Relief Success Story, From Katherine:
"THANK YOU SO VERY, VERY MUCH!!!! I have had chronic spine pain with incredible headaches for 40 yrs. I've spent 10's of thousands of dollars on chiropractic, massage and several other forms of body realignment. My neck has NEVER felt so free as it does now. THANK YOU! THANK YOU! THANK YOU!!! I shared you on my FB and am emailing family and friends with your link. xo xo xo God bless you so very much!!" Katherine, United States
You can do it too!
Click directly to any pain relief video on this page:
Intro,
Video 1,
Video 2,
Video 3 .
*Please Watch This Short Video First. Thanks.
Please visit the techniques page now, if you haven't already.
On the homepage I describe…in detail…the 3 Simple Steps and the 4 Basic Facts about your body that make it possible for you to provide your own joint pain relief.
Detailed Instructions For
Neck Pain Relief
Click directly to any pain relief video on this page:
Intro, Video 1, Video 2, Video 3 .
Neck pain relief, especially when the pain is at the top of your neck, can often be achieved by simply releasing the muscles that attach to the bottom of your occiput (the base of your skull) and then connect to the top of your neck . Our modern lifestyles of driving a lot and sitting in front of computers often work these muscles in ways that will cause them to tighten over time and cause your neck pain.
Here's what you're going to do:
A. Top of Neck and Base of Skull
We'll be using press-hold-move technique and the hand-on-hand technique to release any tight tissue you find in this area.
Find tight tissue by pressing into the tissue in this area of your upper neck and base of your skull. Once you find the tight tissue, press on it with your fingertips (using one or both hands) and nod, turn, twist your head to make the tissue you are pressing on release as you force it to move while you press on it.
Feel free to use the press-pull-release technique in addition to what you've already done. It will only enhance your results.
Notice the amount of pain relief this Step 1 provides.
Click directly to any pain relief video on this page:
Intro,
Video 1,
Video 2,
Video 3 .
Sometimes you'll get simple, instant relief from Step 2. Sometimes it's Step 1 or Step 3 that seems to provide more neck pain relief, but the only way to tell is to do the techniques.
Here's what you're going to do:
A. Upper Shoulder and Lower Neck
Using the same hand-on-hand technique you learned in Step 1, sit in a chair and take the tips of your fingers of your dominant hand and place them on the back of your neck where your neck and shoulder come together. If you are right handed, then your right is your dominant hand…If you are left handed, that is your dominant hand. Now curve your fingers a little bit, and take the palm of your other hand and place it over your dominant hand.
Start by pressing the tips of your fingers into the tissue in this area around your neck and shoulder intersection and notice any tender areas. Now, using your hands the same way, gently move up your neck with your fingertips on both sides of your spine and notice any tender areas.
Now do the press-hold-move technique by moving your head in anyway that makes the tissue you are pressing on to move.
Use the press-pull-release technique in addition to what you've already done. It will only enhance your results.
Again, notice the amount of neck pain relief this Step 2 technique provides.
Click directly to any pain relief video on this page:
Intro,
Video 1,
Video 2,
Video 3 .
There are many muscles that can negatively affect the delicate balance of your neck and cause you to seek neck pain relief. Any muscle that attaches to your collar bone (clavicle) or your shoulder blade (scapula) can be causing your neck pain. Like the rigging on a sailboat, one muscle being too tight can throw the whole balance of your neck off and cause neck pain. We're going to take a few moments to check them all.
Here's what you're going to do:
A. Side of Neck -
Using the hand-on-hand technique that you did in Step 1 and 2 we're going to work on the side of your neck (scalenes and sternocleidomastoid muscles).
Place the tips of your fingers from your dominant hand where the side of your neck meets your skull (just behind your jaw bone). With your other hand gently pressing on your fingers to add pressure, gently press on the side of your neck from top to bottom and notice any tender (tight) spots.
Now do the press-hold-move technique. While gently turning your head like you were saying the word "NO," press on the tender spots until you notice them becoming less tender. Repeat this for the other side of your neck as well.
Notice how much neck pain relief this technique creates.
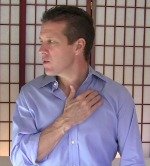
B. Collarbone -
Using the same "hand on hand" positioning, place the tips of your fingers from your dominant hand onto the muscle tissue on the underside of your collarbone (subclavius, pectoralis minor, pectorals major). Find tight/painful/tender tissue by pressing into the soft tissue on your upper chest, just under the length of your clavicle. Next, doing press-hold-move technique while turning your head like you are saying the word "NO" press your finger tips into the tender spots.
Notice how much neck pain relief this technique creates.
C. Top of Shoulder -
Using the same "hand on hand" technique we're going to work on the top of your shoulders (supraspinatus muscle) that can sometimes pull on your neck and cause neck pain.
Put the tips of your fingers where your shoulder meets your neck (on the very top of your shoulders, not on your upper back). Press on the tissue all the way out to your shoulder muscles and notice any tender spots. Using the "hand on hand" technique press on any tender tissue while turning your head like you are saying "NO" continuously. Repeat this process for the other side.
Now, work any remaining tender spots using press-pull-release technique.
D. Side of Shoulder Blade -
This one technique can often instantly provide neck pain relief. Take your hand and reach it across your body so your finger tips can feel the very outer edge of your shoulder blade. Now come forward just a bit so your finger tips are touching the muscles on the front edge of your shoulder blade (teres and subscapularis muscles). Now do press-hold-move technique. Press on any tender spots in these muscles, while you gently flap your arm being worked on like a wing,. Repeat this process for the other side.
Work on any remaining tender spots in this area using the press-pull-release technique.
E. Upper Back -
We're going to do tennis-ball-press technique
Lie on the floor with a tennis ball under your shoulder blade or put a tennis ball in a sock and lean against the wall with the tennis ball between your shoulder blade and the wall (infraspinatus muscle).
Slide your elbow along the floor or wall while the tennis ball is placed under any tender spots. Now position the tennis ball in the space between your shoulder blade and your spine (rhomboid muscle). Move your arm in the same motion as you put pressure on any tender spots. Do this on both sides of your upper back.
F. Jaw -
If you have not yet experienced substantial neck pain relief then you most likely need to release your jaw…especially if you grind or clench your teeth at night. Click this jaw joint pain link or on the menu bar to your left to learn how to release your jaw.
Self-Assessment Of
Neck Pain Relief
Was there one specific neck pain treatment that instantly relieved your pain? Remember what worked best for you, so you can do that first next time you need neck pain relief.
Are you still experiencing some neck pain?
Investigate a bit and you'll eventually find which techniques work best for you to provide the neck pain relief you are seeking. Then you'll be able to fix yourself whenever you desire!
Pain Relief Success Story, From Cullen:
"Thx Gary. I crashed on my road bike over a Year ago. And after getting X-rays and diagnosis of bone spur from a top sports surgeon and costly physical therapy for six weeks for My shoulder. And neck pain instead of going thru with therapy I googled do it yourself pain relief...I saw & watched your videos and have been self rehabbing my shoulder and neck pain and healing with no costly therapy or massages... I recommend you to my family and friends. You are a true blessing." Cullen, United States
MORE
Neck Pain Relief Pages
Stiff Neck Pain Treatment (Click Here)
Pillows For Neck Pain Relief (Click Here)
Neck and Shoulder Pain Relief (Click Here)
Return from this Neck Pain Relief page to the
Do-It-Yourself Joint Pain Relief Homepage
This Free Pain Relief Website
By Clicking On Your Favorite Icon Below:
Add Gary Crowley to your Google Plus Circles -
Google+ (click here)
Copyright © 2011 - 2022 DiyJointPainRelief.com


